Publish to Fedi Foundation
Publishing to the Fedi Foundation website is relatively easy. This tutorial will take you through the process step by step.
Contents
Prerequisites
This website is created with Jekyll and both source and content is hosted on Codeberg. In order to edit the site content you need the following:
- A user account at Codeberg.
- Membership at Discuss Social Coding to be attributed as author.
- Basic understanding of Markdown syntax.
- Know how to Edit content and submit changes for review.
- Have Git installed when not using the browser user interface.
Publishing pages
Site model
The information model of the website works according to the following rules:
- There are Pages and Posts.
- Posts are shown on the Landing Page.
- The most Recent Post is shown first and is more prominent.
- Next three posts appear to the left of most recent post.
- A single Sticky Post is displayed in a yellow card design.
- All Other Posts appear in a paginated view below.
- Featured Posts appear in a paginated list on the left beside other Posts.
- A Post Category determines the site section to which it belongs.
- Categories are shown as entries in the Top Menu.
- A Post may have one or more Tags.
- The First Tag is used to categorize the Post in section pages.
- First Tags are category-specific (see the list below).
- Undefined First Tags for a Category are categorized as Other.
- Pages are not automatically added to the site hierarchy.
- A Page must be specifically linked from other content.
These are the First Tags that are defined for each Category:
- Learn: tutorials, reference, guide, best-practice
- Ideate: vision, design, pattern, brainstorm
- Create: research, specification, fep, code
- Foster: advocacy, process, activity, support
- Community: does not support First Tag sub-categories
So other tags are still allowed, but just aren’t used as categories on section pages.
Page design
A page consists of two parts: it starts with front matter followed by markdown content. The front matter determines how the page is displayed. Below is the front matter for this page:
---
title: "Introducing the Federated Diversity Foundation"
description: "Foundation for community empowerment, encouraging healthy evolution of Fediverse technology."
author: aschrijver
license: CC-BY-NC-SA
categories: community
tags: [vision, roadmap]
status: sticky
image: pexels-anna-shvets-4312861.jpg
---
The following table explains all the supported front matter fields.
| Variable | Description |
|---|---|
title |
Required. The title of the page, that is displayed as a Level 1 header, and is also added to the browser tab title. |
description |
Required. The description shows on the left side-bar in Posts, and also in link previews (OpenGraph, Twitter Cards). Keep the description short and snappy. |
author |
Required for Posts, optional for Pages. The value you supply to this field must refer to an entry in people.yml and must correspond to a valid Social Coding forum member account name. An array of multiple authors is supported. See Adding authors for more information. |
license |
Optional, defaults to CC0 Public Domain. As author you can choose to override the public domain license, and opt instead for Creative Commons Share-Alike by specifying CC-BY-SA or choose Creative Commons Non-Commercial Share-Alike with CC-BY-NC-SA. See licensing details for more info. |
categories |
Required for Posts. Though the field name is plural, only a single value is supported. See Site model for available Categories to choose from. |
tags |
Optional, only applies to Posts. One or more tags can be supplied in an array. Use of tags is recommended. If there are no tags, or the First Tag is unknown for the Category, then they are shown in the “Other” section of the Category page. See Site model for supported First Tags. |
image |
Optional. It is highly recommended to supply an image. For Posts the image is displayed above the body text, and shown on landing page and category pages. It is also used for link previews (OpenGraph, Twitter Cards). Note that depending on display location, top and bottom may be sheared off, hence decorative images work best. On Posts no image path should be specified. |
status |
Optional, only applies to Posts, requires permission. Posts can be either featured or sticky. Setting this field requires permission by a site maintainer, by placing a request in the site’s issue tracker. |
layout |
Optional, only applies to Pages. For Pages you can choose different page layouts, like page-sidebar. More layouts will be added as the site evolves. Posts have the default layout of post. |
permalink |
Optional, only applies to Pages. Use to to specify the URL path the Page should have when displayed in the browser address bar. When omitted the filename determines the URL path. |
If you want to create and publish a Page with a new layout, then first consult with the site maintainers via the issue tracker.
Folder structure
The source code of this website lives at Codeberg in the fedi-foundation repository. The project has the following folder structure:
[root]
   ├── _data
   │     └── people.yml  # Social Coding community members and authors
   ├── _includes         # building blocks for the website
   ├── _layouts          # page layouts that are available
   ├── _pages            # all the Pages that have been defined
   │     ├── about.md    # the /about page of the website
   │     └──  ...        # your custom Page here
   ├── _posts            # all the Posts that have been published
   │     └──  ...        # your published Post here
   ├── _sass             # styles in SCSS to be compiled to CSS
   ├── _site             # the compiled output of the website
   ├── assets            # folder static site resources
   │     ├── css         # static, non-compiled CSS files
   │     ├── fonts       # custom fonts to be loaded
   │     └── images      # all the site images (see below)
   ├── _config.yml       # website configuration
   ├── index.html        # website landing page
   └── README.md         # repository description text
Important for publishing are the _pages, _posts and assets/images folders:
- Pages and Posts must be placed in the corresponding folders.
- They are Markdown documents having a
.mdextension.
- They are Markdown documents having a
- Post filename must begin with publishing date in this format
YYYY-MM-DD.- For example this post
2021-03-30-my-post-is-here.md. - Will be published at this URL path
/2021/03/my-post-is-here/
- For example this post
- Images must be placed in
/assets/images/postsfolder.- A Post image should be around 750 x 500 pixels.
- Images should be optimized, and ideally be smaller than 100 kilobytes.
- Always give an alt-text:

Licensing
The default license used on the website is Creative Commons CC0 1.0 Universal (CC0 1.0) Public Domain Dedication, but for individual posts and pages this can be overridden with the license frontmatter setting (see Page design). Supported alternative licenses are:
- Attribution-ShareAlike 4.0 International (CC BY-SA 4.0)
- Attribution-NonCommercial-ShareAlike 4.0 International (CC BY-NC-SA 4.0)
The different license that is used is indicated in three different places:
- In the page body below the Author’s bio if an
authoris specified. - In the footer of the website, which will change accordingly.
- In the SEO metadata of the page that search engines use for indexing.
A public domain dedication means you waive all copyright claims to your work and donate it to the public, while the alternative licenses allow you to retain those rights.
Profile pages that are part of the People Directory are licensed CC BY-NC-SA by default. This cannot be overridden.
Adding authors
To publish your own pages or co-author with others, you must provide author details and optionally create a Social Coding member profile for inclusion in the People Directory.
Provide author details
TODO: Document this section.
Create member profile
TODO: Document this section.
Editing content
There are two options for editing site contents:
- Using the Codeberg user interface directly from the browser.
- Using your local computer and submit via Git version control.
We recommend using Git as it gives more control. All editing occurs on your own fork (copy) of the site content. When done editing changes are submitted for review with a Pull Request. First fork the repository to your own Codeberg account:

Using the browser
To modify an existing page, navigate to it and click the ‘Edit’ icon:

Create a page by selecting ‘New File’ to edit in the user interface or ‘Upload File’:
Now you can edit the page by typing Markdown-formatted text:

When you are done making changes, then it is time to send the Pull Request:
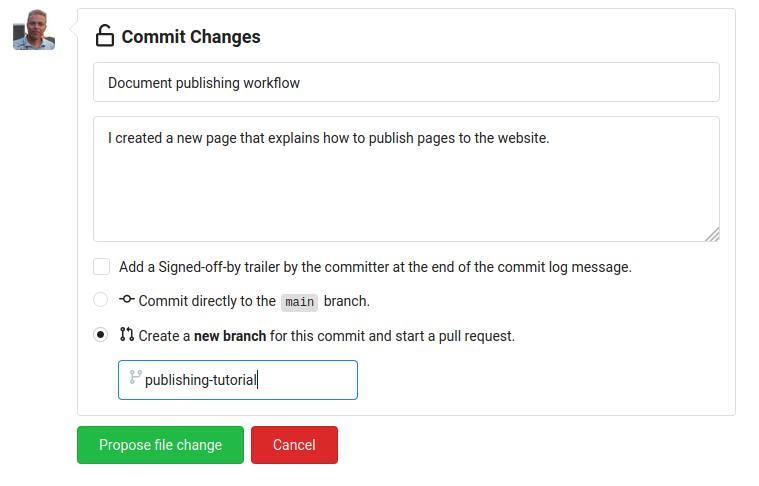
After clicking ‘Propose file change’ the changes are sent to the source repository for review.
Using Git
In order to edit on your local computer you must checkout your fork of the fedi-foundation repository. Ensure you have Git on your computer, or otherwise install it first. Now, note that Git can take some time to get used to. It has a lot of functionality for source code revision control. Luckily we don’t need most of it. Here is a Git Cheat Sheet (PDF) with an overview of most-used commands.
Copy the clone URL of your fork via the user interface:

Now on the command line in the directory where you want to checkout the repository type:
git clone <my-forked-repository-url>
The entire repository is now copied to /fedi-foundation in your folder, and ready for editing using any text editor. If you already did this before, you must ensure that your local copy is up-to-date with the source repository so that you are not editing outdated files (also explained in this Blog post).
To do so for the first time you must first make Git aware of the location of the source repository (retrieve the URL in the same way as you did for your fork):
git remote add upstream <fedi-foundation-source-repository-url>
With the remote added, you can fetch any changes and merge them in your local copy:
git fetch upstream
git merge upstream/main
Now your local repository is up-to-date and you can start editing.
All edits you make are tracked automatically, but new files need to be added first. You can type git status for an overview. To add files type:
git add <file1> <file2>  # add untracked files
git add -A               # or add all untracked files in one go
Once you have completed a number of modifications that represent something to publish, you create a commit. In the following example two commits are created. One represents adding a new page, and one represents adding author details and an author profile:
# Commit the new page that explains how to publish.
git commit _pages/publish.md -m "Add publishing tutorial"

# All other changes relate to author. Adding -a includes them in one go.
git commit -am "Add 'Alice' author details and profile"
Done editing, changes made, it is now time to send them to your fork:
git push
You are asked to log in using your Codeberg account, after which commits are transfered. The only remaining taks is to create the Pull Request, and this is done on your fork using the Codeberg user interface:

Give the pull request a clear Title and Description and after submiting the commits are sent to the source repository for review.